Download Duplica2
Download here the last version (v1.2) of Duplica2. (español ![]() )
)
As the download is direct from the internet, it might be that Windows «complain» and ask for confirmation to open it.
Do it with confidence, the program has been developed directly by us and does not contain internet connections or any dangerous element.
This program is self-developed and is offered AS-IS, without any type of guarantee or support that has not been specifically agreed on writing.
Installation: no installation is needed. Just copy Duplica2.exe to a folder of your convinience, and double-click to launch it.
License
You can download Duplica2 for free and use the program to make the catalog of your disks / folders, manage the catalog (comparison, search, occupation) and locate duplicate files.
Additionally, until May 20, 2020 you have a free temporary license to use all the duplicate management functionality (viewing, folder deletion, file-to-file deletion)
If you want a Premium license for your team, you can request it at jardindeljubilado@gmail.com, at a cost of € 5.
The license allows you to use the program with all its functionality in the current version and in all its minor releases (corrective, v1.xx). It will not allow you to access other major releases (new features, v2.xx) that may appear. The license entitles you to use the program AS-IS, with no further garantee or responsability.
User Manual
Duplica2 is an application created specifically to manage duplicate files on your disk / s.
Additionally it will allow you to:
-
- View the occupation of a disk or directory, letting you know how much each folder occupies or what folders or files are filling the space. You can also see the occupation by file type.
- Find a file or folder on a disk or directory, being able to use wildcards (e.g. files whose name contains «book», such as «theBigBook.doc»).
- Compare the content of a disc or directory with the content it had at another time, being able to archive «snapshots» of the content catalog of any disc. You can make the comparison even if it is not available (the pendrive, USB disk, mobile or network disk) at the time of comparison.
- Compare a disk or folder with the disk or folder where you keep your backup, to verify that the content is correct: locate files that are missing or left over, or see files that are different.
When you run the program, the main screen will appear which, as you can see, is divided into 3 horizontal sections:
-
-
- Catalog Management
- Duplicate Detection
- Duplicate Management
-
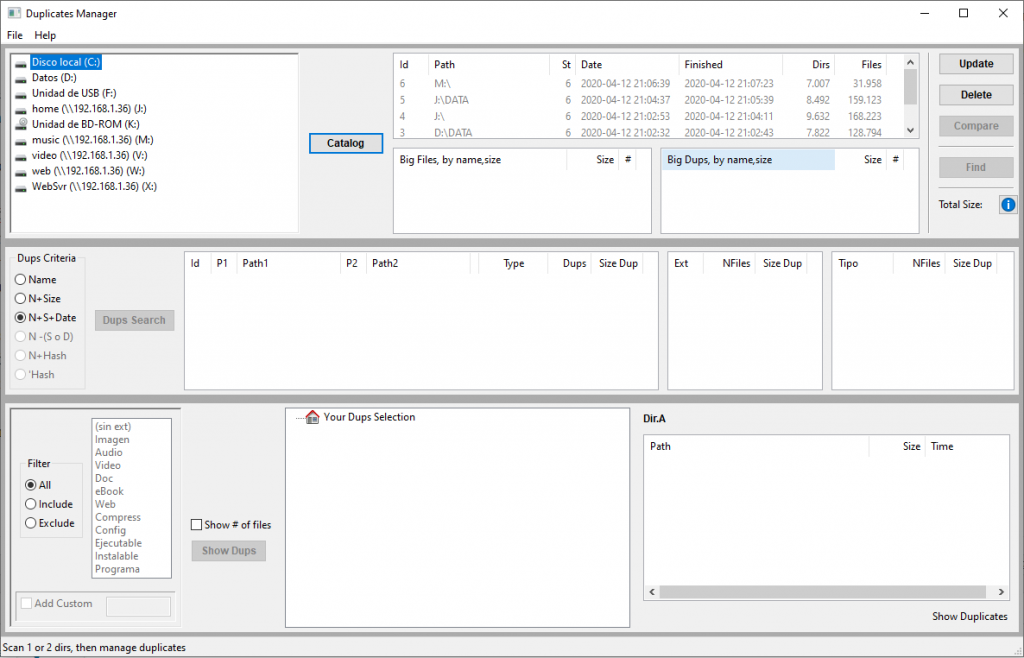
Catalogs
A catalog contains information about the folder structure of a disc or folder and all the files it contains (including information about its name, location, size and date of last modification). It is the key element on which all operations are based.
To create a catalog, select from the list on the left, in the upper section, the disk you want to scan (you can double-click and go to another folder if you don’t want to make the catalog of the entire disk but only of part of it).
If you want to make the catalog of the contents of a mobile, you will see that it does not appear in the list of units, even if you connect it via USB. Do not worry, it has a solution and you can access both the internal memory of the mobile and the SD card. To do this you must assign a network drive in Windows to the mobile (that is, that its content appears as a network drive).
Here I explain how to attach a mobile to a network drive unit
Once you have selected the disk or folder you want to get the catalog from, click on the Catalog button. You will see that in the status bar (at the bottom of the window) it informs you of the elements it is adding to the catalog. The process may take a few seconds or a few minutes, depending on the size of the disk or folder to be scanned, the type of disk (SSD, USB stick, hard disk, …) or if it is a local disk or a networked disk.
When the catalog process ends you will see that a new item appears in the list on the right, indicating what you have cataloged, when the process started and when it ended. It also indicates the number of folders that have been found and how many files have been cataloged. If the program did not have permissions to access any folder, you will get a warning message (those directories or files that have not been added to the catalog).
If you select a catalog from the list, the total size of the files it contains will be shown on the right, in blue, in Bytes, KiloBytes (KB), MegaBytes (MB) or GigaBytes (GB).
Additionally, the list of the (25) largest files found in the catalog will be shown in the lists below, indicating their size, and on its right side, the list of the main duplicates that have been found and how much they occupy. These duplicates are files that have the same name and extension and the same size, althought their dates or content may be the same or different.
Search for duplicates
There are several criteria to identify if 2 files are duplicated or not. The most restrictive would be that they have the same name, the same size, the same date and that the content within the file is exactly the same, byte by byte. Analyzing the content of all the files on the disk or folder byte-by-byte would imply a very important load (for the computer, for the disk and for the user’s time) so, in a first step the application will not look inside the files ( the option is given later, for a smaller number of files) and the options offered are:
-
- That they have the same name, the same size and the same modification date (the contents of the files are not looked at, so there is no absolute guarantee that they are identical, but it seems very likely).
- That they have the same name and the same size, even if the modification date is different (it can be, e.g., because the file has been opened and saved again without changing it, or that it has been changed, but without modifying its size, e.g. if it is text changing «obserbe» to «observe»). This check is usually reliable enough for images or videos, but in other documents you must ensure that you know what you are doing.
- That they have the same name, although the size or date are different. Keep in mind that if 2 files have a different size, their content is sure to be different, so you should only use this option in specific cases or to locate versions of the file that have the same name.
You can search for duplicates within a catalog, or taking into account 2 catalogs (to search for duplicates between them and within each one).
The first step is to select the catalog or catalogs to manage. If you want to select 2 catalogs click on the first one and then, pressing the CTRL key, click on the second one.
Then, in the middle section, select the search criteria for duplicates, and click the Search button. The computer will search for duplicates that meet that criteria and will generate a duplicates Result that you can see in the middle list. The list also indicates the number of duplicates that have been found and how much additional space they occupy (unless you have searched for duplicates regardless of size).

Keep in mind that in the same catalog you can search for duplicates by different criteria (e.g. to delete photos when they have the same name and size, but documents only if they also have the same date)
If you select a duplicate Search Result, on the right side you will see how many duplicates have been found, for each file extension in the first list, and by content type in the list on the right. In addition to the number of duplicate files, the «lost» space is shown (how much space would we recover if we deleted all the duplicates, leaving only 1 original of each file).
Duplicates Management
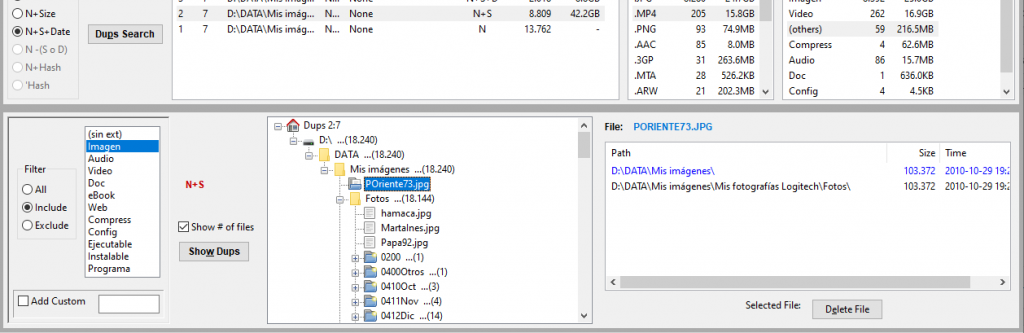
Duplicate management is done in the lower section. The first thing we must do is select a Search Result from the intermediate section (remember that a duplication criteria has been applied to each result, which you can see in the list).
The management can be done for all the duplicates found, we can include only some types of files (image, audio, video, …), or we can include all but what we explicitly exclude. To give more flexibility to the filter, you can add «custom» file extensions (check the «Custom» option and write one or more extensions to consider, separated by commas -p.e. .ext1 or .ext1, .ext2 –).
Then click on the Show Dups button (this processing may take some time depending on the number of duplicates).
Before clicking on Show Dups you can mark or not the check to show you in each folder the number of duplicates it contains. If you check it, the process of displaying the duplicates will be somewhat slower.
When finished, a folder structure containing all the duplicates found will have been generated in the area on the right. Folders that do not contain duplicates will not be displayed for ease of management. If we open a folder, it will show the files it contains that are duplicates and other folders if they also contain duplicate files).
If you see that a file has «(H)» behind its name, it means that it is a hidden file (it will not be visible in a file explorer, despite being there).
If we select a file, we will be able to see in the list on the right where the file is located (in blue), and all its duplicates (in black).
If we select one of the locations in the list on the right, clicking the right mouse button will give us options to
-
- Open the folder where the file is (so we can see what other files are there, even if they are not duplicated)
- Open the file, to see its content
- Show the directory of the selected file in the tree on the left, swap folders (this is also achieved by double-clicking on a path).
Below the list we are also given options to delete the file in the selected path.
IMPORTANT: duplicate management is based on the information in the catalog. NEVER manage duplicates on old catalogs (update it with the update option if you have made changes to the file system since the catalog was generated). DO NOT make changes directly to the filesystem while you are managing duplicates (if you directly delete a file, eg from the file explorer, and do not update the catalog, that file will still be in the catalog and you could delete another file with the same name thinking it is a duplicate, when it would already be the only existing copy).
If in the tree, instead of selecting a file we select a folder we will be able to see in the list on the right in which other folders there are duplicate files with those in this folder and in all its subfolders.
If a path in brown appears in the list on the right, it is indicative that there are duplicates within the folder that we have selected in the tree, and to manage them we must enter more into the tree.

In the list on the right select a route on black. By clicking the right button we will have an option to open that folder and another to swap the folders (that is, the folder that we have selected is shown in the tree and in the list the folders that have duplicates with the content of this -this swap also occurs if we double-click on a path-).
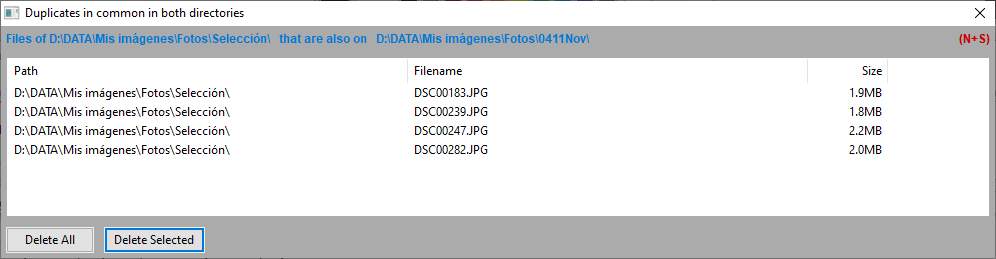
Buttons also appear below, one to show us the duplicate files in common between the selected folder in the tree and the selected folder in the list (and all its subfolders), and another to delete all duplicates in common between both folders without examining them first.
Catalog Archiving
The catalogs you generate will be deleted when you close the application (to manage duplicates, it is convenient that the catalogs are newly generated). If you want to keep a catalog, in the menu you have an option to archive them (you can also do so by selecting the catalog to archive and typing CTRL-A). Before archiving a catalog, you may want to give it a name that reminds you of what is in it. To do this, select the catalog, click the right mouse button and select the «Add Description» option. In the window that will appear, type the name or the description you want to give (this text will be saved in the archive and will be shown every time you mouse over a catalog).
When you open the application, the ones you have archived will be shown in the catalog window (in gray) along with any new you generate (in black). Archived catalogs are not loaded into memory (so as not to unnecessarily load the application). If you want to work with an archived catalog, you must load it (Load menu or by typing CTRL-L). When the upload is complete, it will appear in green, indicating that you can use the catalog options (compare, find, view content). Duplicate management is limited for archived catalogs (they must be created or updated in the current session): you can locate them, but will only be able to delete duplicates for fresh new catalogs.
Search within a catalog
At any time you can search for files or folders within a catalog. To do this, select the catalog and click on the Find button.
Indicate if you want to search for a directory or a file and if you are interested only in those of certain type or you want a full search.
In the text field put the string to search and press the Search button. If you leave the check marked, it will search for files or directories that contain the indicated text in their name. If you don’t mark it, you will search for files or directories that are called exactly as you have indicated (without taking into account upper or lower case)

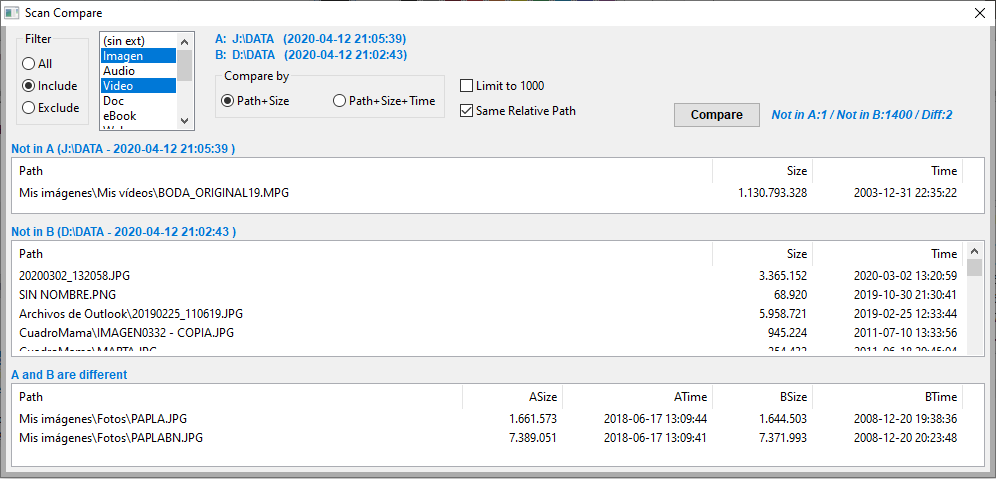
Comparing Catalogs
Comparison of catalogs is useful mainly in 2 situations:
-
- Compare your disk at 2 different times, to see what has changed in that date range (what has been added, what has been removed, what files have changed)
- Compare a disk or folder with the disk or folder where your backup is stored, to verify if the backup is correct, if any file is missing, if there are files that are not in the original, or if the date or size of the original and the copy are different (eg because you have edited the copy instead of the original -in which case you would lose the changes when updating the copy-).
To make the comparison select the 2 catalogs in the main window and click on the Compare button. A window with 3 sections will open:
-
- files that are in the first catalog and not in the second,
- files that are in the second, but not in the first,
- files that are in both catalogs, but are different, in size or date
As in other file lists, also here with the right button you will have the option to open the file.
Space occupied in a catalog
To see how much space folders occupy within a catalog (generally to know who is eating the space), select the catalog in the main window and click on the information icon next to the total size of the catalog.
A window will open where you can see the size of each folder / directory (with its subfolders / subdirectories) and navigate through the folder structure. The right column shows what percentage of the total catalog space is occupied by each folder (and what is inside).
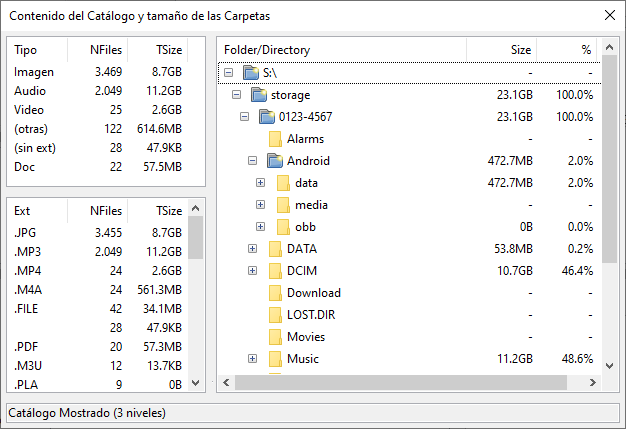
In the lists on the left you can see how much is occupied by files of each type and each extension, and the number of files of each type in the catalog.
Preferences
There is a menu option where you can change some preferences:
-
- Application language
- File types and their association to extensions (not yet available)
- Catalog archive location
- Number of levels to display in the catalog information tree in the 1st phase (do not go too high for large catalogs)
- Optional maximum of results in the comparison between catalogs
- Application License (all or some of the functionalities may require a temporary or long-term license)
En las listas de la izquierda puedes ver cuanto ocupan los ficheros de cada tipo y de cada extensión, y el nº de ficheros de cada uno que hay en el catálogo.